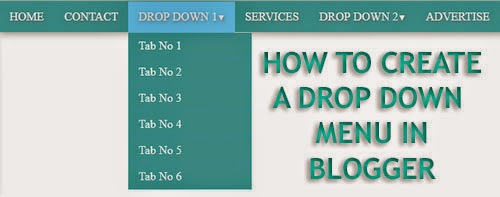
A navigation menu/drop down menu makes your blog/website user-friendly
by allowing your visitors to easily navigate your blog posts by just
selecting categories from the menu. A navigation menu plays an important
role in your blog development, either its a top website like Mashable
or a newly created blog, a drop down menu is an essential element of
every website. It makes your blog user-friendly, easy to navigate and
also adds a new and unique look to your design and makes it look
professional. After reading all these advantages if you want to add a
Drop Down menu to your Blog/Website, then in this tutorial we'll show
you that how to create a Drop Down Menu in blogger. The credit goes to MBT. The design we're going to share today is simple, clean and will surely attract your visitors.
Now again Search for the <body> tag and just below it add the following code
Finally click Save Template button and you're done!
Read More
How to Create a Drop Down Menu in Blogger
First and foremost, log in to your Blogger Account >> Select a Blog >> Template and click Edit HTML. Click inside the template code area and by using Ctrl+F search for the ]]></b:skin> tag. Now copy the below code and paste it just above/before it (]]></b:skin> Tag)body {
margin: 0px;
}
#menu{
background: #3EA9AC;
color: #fff;
height: 40px;
text-transform:uppercase;
border-bottom: 2px solid #3EA9AC;
box-shadow: 1px 2px 9px #B1B1B1;
border-top: 1px solid #3EA9AC;
}
#menu ul,#menu li{margin:0 auto;padding:0 0;list-style:none}
#menu ul{height:45px;width:1024px}
#menu li{float:left;display:inline;position:relative;font:'Open Sans',Helvetica,Arial,sans-serif;text-shadow: 1px 2px 4px #838383;}
#menu a{display: block;
line-height: 40px;
padding: 0 14px;
text-decoration: none;
color: #fff;
}
#menu li a:hover{
color: #E4E4E4;
-webkit-transition: all .1s ease-in-out;
-moz-transition: all .1s ease-in-out;
-ms-transition: all .1s ease-in-out;
-o-transition: all .1s ease-in-out;
transition: all .1s ease-in-out;
background: #5FC6EB;
}
#menu input{display:none;margin:0 0;padding:0 0;width:80px;height:30px;opacity:0;cursor:pointer}
#menu label{font:'Open Sans',Helvetica,Arial,sans-serif;display:none;width:35px;height:36px;line-height:36px;text-align:center}
#menu label span{font-size:16px;position:absolute;left:35px}
#menu ul.menus{
height: auto;
overflow: hidden;
width: 170px;
background: #3EA9AC;
position: absolute;
z-index: 99;
display: none;
}
#menu ul.menus li{
display: block;
width: 100%;
font:'Open Sans',Helvetica,Arial,sans-serif;
text-transform: none;
text-shadow: none;
border-bottom: 1px dashed #31AFDB;
}
#menu ul.menus a{
color: #FFF;
line-height: 35px;
}
#menu li:hover ul.menus{display:block}
#menu ul.menus a:hover{
background: #5FC6EB;
color: #FFF;
-webkit-transition: all .1s ease-in-out;
-moz-transition: all .1s ease-in-out;
-ms-transition: all .1s ease-in-out;
-o-transition: all .1s ease-in-out;
transition: all .1s ease-in-out;
}
Now again Search for the <body> tag and just below it add the following code
<nav id='menu'>
<input type='checkbox'/>
<label>≡<span>Blogolect</span></label>
<ul>
<li><a href='/'>Home</a></li>
<li><a href='#'>Contact</a></li>
<li><a href='#'>Drop Down 1<font size='1'>▼</font></a>
<ul class='menus'>
<li><a href='#'>Tab No 1</a></li>
<li><a href='#'>Tab No 2</a></li>
<li><a href='#'>Tab No 3</a></li>
<li><a href='#'>Tab No 4</a></li>
<li><a href='#'>Tab No 5</a></li>
<li><a href='#'>Tab No 6</a></li>
</ul>
</li>
<li><a href='#'>Services</a></li>
<li><a href='#'>Drop Down 2<font size='1'>▼</font></a>
<ul class='menus'>
<li><a href='#'>Tab No 1</a></li>
<li><a href='#'>Tab No 2</a></li>
<li><a href='#'>Tab No 3</a></li>
</ul>
</li>
<li><a href='#'>Advertise</a></li>
</ul>
</nav>
- Replace Blogolect with your Blog name
- Replace # with the Links and rename the categories
Finally click Save Template button and you're done!

