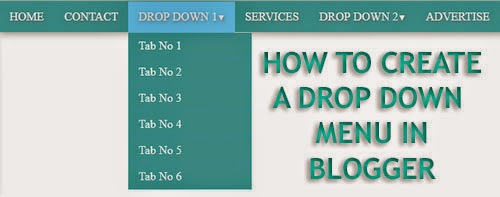
How to Create a Drop Down Menu in Blogger
First and foremost, log in to your Blogger Account >> Select a Blog >> Template and click Edit HTML. Click inside the template code area and by using Ctrl+F search for the ]]></b:skin> tag. Now copy the below code and paste it just above/before it (]]></b:skin> Tag)body {
margin: 0px;
}
#menu{
background: #3EA9AC;
color: #fff;
height: 40px;
text-transform:uppercase;
border-bottom: 2px solid #3EA9AC;
box-shadow: 1px 2px 9px #B1B1B1;
border-top: 1px solid #3EA9AC;
}
#menu ul,#menu li{margin:0 auto;padding:0 0;list-style:none}
#menu ul{height:45px;width:1024px}
#menu li{float:left;display:inline;position:relative;font:'Open Sans',Helvetica,Arial,sans-serif;text-shadow: 1px 2px 4px #838383;}
#menu a{display: block;
line-height: 40px;
padding: 0 14px;
text-decoration: none;
color: #fff;
}
#menu li a:hover{
color: #E4E4E4;
-webkit-transition: all .1s ease-in-out;
-moz-transition: all .1s ease-in-out;
-ms-transition: all .1s ease-in-out;
-o-transition: all .1s ease-in-out;
transition: all .1s ease-in-out;
background: #5FC6EB;
}
#menu input{display:none;margin:0 0;padding:0 0;width:80px;height:30px;opacity:0;cursor:pointer}
#menu label{font:'Open Sans',Helvetica,Arial,sans-serif;display:none;width:35px;height:36px;line-height:36px;text-align:center}
#menu label span{font-size:16px;position:absolute;left:35px}
#menu ul.menus{
height: auto;
overflow: hidden;
width: 170px;
background: #3EA9AC;
position: absolute;
z-index: 99;
display: none;
}
#menu ul.menus li{
display: block;
width: 100%;
font:'Open Sans',Helvetica,Arial,sans-serif;
text-transform: none;
text-shadow: none;
border-bottom: 1px dashed #31AFDB;
}
#menu ul.menus a{
color: #FFF;
line-height: 35px;
}
#menu li:hover ul.menus{display:block}
#menu ul.menus a:hover{
background: #5FC6EB;
color: #FFF;
-webkit-transition: all .1s ease-in-out;
-moz-transition: all .1s ease-in-out;
-ms-transition: all .1s ease-in-out;
-o-transition: all .1s ease-in-out;
transition: all .1s ease-in-out;
}
Now again Search for the <body> tag and just below it add the following code
<nav id='menu'>
<input type='checkbox'/>
<label>≡<span>Blogolect</span></label>
<ul>
<li><a href='/'>Home</a></li>
<li><a href='#'>Contact</a></li>
<li><a href='#'>Drop Down 1<font size='1'>▼</font></a>
<ul class='menus'>
<li><a href='#'>Tab No 1</a></li>
<li><a href='#'>Tab No 2</a></li>
<li><a href='#'>Tab No 3</a></li>
<li><a href='#'>Tab No 4</a></li>
<li><a href='#'>Tab No 5</a></li>
<li><a href='#'>Tab No 6</a></li>
</ul>
</li>
<li><a href='#'>Services</a></li>
<li><a href='#'>Drop Down 2<font size='1'>▼</font></a>
<ul class='menus'>
<li><a href='#'>Tab No 1</a></li>
<li><a href='#'>Tab No 2</a></li>
<li><a href='#'>Tab No 3</a></li>
</ul>
</li>
<li><a href='#'>Advertise</a></li>
</ul>
</nav>
- Replace Blogolect with your Blog name
- Replace # with the Links and rename the categories
Finally click Save Template button and you're done!

